Golem (ゴーレム Gōremu)  | ||||||||||||||||||||||||||||||||||||
| ||||||||||||||||||||||||||||||||||||
Golem: Difference between revisions
Jump to navigation
Jump to search
Shy-Guy2002 (talk | contribs) m add |
Shy-Guy2002 (talk | contribs) →Appearances: updated infobox |
||
| Line 93: | Line 93: | ||
|poison-resist=100% | |poison-resist=100% | ||
|stun-resist=67% | |stun-resist=67% | ||
|ps2-sprites=[[File:Golem DQV PS2.png]] | |ps2-sprites=[[File:Golem DQV PS2.png|130px]] | ||
|ds-mobile-sprites=[[File:DQVII Golem.png]] | |ds-mobile-sprites=[[File:DQVII Golem.png]] | ||
}} | }} | ||
| Line 272: | Line 272: | ||
|romanji=Gōremu | |romanji=Gōremu | ||
|sprite=[[Image:Golem 1.png]] | |sprite=[[Image:Golem 1.png]] | ||
|remake-sprite=[[File:Golem PSX.png]] | |||
|level=45 | |level=45 | ||
|hp=3/5 | |hp=3/5 | ||
| Line 320: | Line 321: | ||
|romanji=Gōremu | |romanji=Gōremu | ||
|sprite=[[Image:Golem 1.png]] | |sprite=[[Image:Golem 1.png]] | ||
|remake-sprite=[[File:Golem PSX.png]] | |||
|level=45 | |level=45 | ||
|hp=6/10 | |hp=6/10 | ||
| Line 328: | Line 330: | ||
|agility=3/10 | |agility=3/10 | ||
|family= {{Material}} | |family= {{Material}} | ||
|in-game-description= | |in-game-description=Its body cracks if it tries to talk. | ||
|abilities=[[Muster Strength|ChargeUp]], [[Meditation|Meditate]], [[Boulder Toss|RockThrow]] | |abilities=[[Muster Strength|ChargeUp]], [[Meditation|Meditate]], [[Boulder Toss|RockThrow]] | ||
|habitat= | |habitat= | ||
| Line 369: | Line 371: | ||
{{DQMJmonster | {{DQMJmonster | ||
|name = Golem | |name = Golem | ||
|kanji=ゴーレム | |||
|romanji=Gōremu | |||
|image =[[File:DQMJ Golem icon.png]] | |image =[[File:DQMJ Golem icon.png]] | ||
|bestiary=#139 | |||
|strength=990 | |||
|defence=990 | |||
|agility=640 | |||
|wisdom=780 | |||
|hp=990 | |||
|mp=340 | |||
|family = {{Material}} | |family = {{Material}} | ||
|rank = A | |rank = A | ||
| Line 385: | Line 396: | ||
{{DQMJ2monster | {{DQMJ2monster | ||
|name = Golem | |name = Golem | ||
|image = | |kanji=ゴーレム | ||
|romanji=Gōremu | |||
|image =[[File:DQMJ2 Golem icon.png]] | |||
|family = {{Material}} | |family = {{Material}} | ||
|rank = C | |rank = C | ||
|size = S | |size = S | ||
|bestiary=#149 | |||
|strength=670 | |||
|defence=580 | |||
|agility=280 | |||
|wisdom=540 | |||
|hp=730 | |||
|mp=260 | |||
|weapons = {{Sword}}s, {{Hammer}}s, {{Claw}}s, {{Staves}} | |weapons = {{Sword}}s, {{Hammer}}s, {{Claw}}s, {{Staves}} | ||
|traits = [[List of Traits in Dragon Quest Monsters: Joker|Psycho]], [[List of Traits in Dragon Quest Monsters: Joker|Crafty Sagger]] | |traits = [[List of Traits in Dragon Quest Monsters: Joker|Psycho]], [[List of Traits in Dragon Quest Monsters: Joker|Crafty Sagger]] | ||
| Line 614: | Line 634: | ||
==={{DQKK}}=== | ==={{DQKK}}=== | ||
{{Stub}} | {{Stub}} | ||
==Etymology== | ==Etymology== | ||
Revision as of 19:17, 24 August 2026
| Dragon Quest monster | |
|---|---|
| Golem | |
 Art by Akira Toriyama | |
| Japanese | ゴーレム |
| Romaji | Gōremu |
| First appearance | Dragon Quest |
| Variants | Brickman (infamous monster) Collum o' golem Chocolate golem Frankengolem Glacial golem Glyphic golem Gold golem Grim golem Mazin Ruby golem Ruin golem Stone golem |
The golem is a recurring Material monster in the Dragon Quest series. Introduced in the first game as a boss, it has since appeared in several other installments of the series, primarily as a normal enemy.
Characteristics
Golems are hulking man-shaped monsters made of clay bricks. This sums up most of their appearances with their face being the only other detail: a slit-like opening with two eyes glowing from the darkness.
Since the appearance of the first golem the species has solidified itself as a hefty force of physical might but one that lacks in resistance to spells. One of the most notable vulnerabilities of the golem is that of Sleep-inducing abilities, an Achilles' heel that made the first golem easy to defeat and has since, for the most part, stuck with the monster as one of its more unfortunate qualities.
Appearances
Dragon Quest
The golem guards at the outskirts of the town of Cantlin, and must be defeated before that town may be entered. It can be put to Sleep with the Faerie Flute to make the battle easier, though casting Snooze will never work.

Golem (ゴーレム Gōremu)  | ||||||||||||||||||||||||||||||||||||
| ||||||||||||||||||||||||||||||||||||


Dragon Quest V: Hand of the Heavenly Bride
The first reappearance of the Golem since it was introduced in the original game. Though they possess no notability in the game's story, they are among the easiest monsters to recruit and far and away one of the most powerful as well.
Golem (ゴーレム, Gōremu ) Big Book of Beasts No. : #123  | ||||||||||||||||||||||||||||||||||||||||||||||||
| ||||||||||||||||||||||||||||||||||||||||||||||||
| ||||||||||||||||||||||||||||||||||||||||||||||||


Dragon Quest VII: Fragments of the Forgotten Past
The golem is encountered as a boss before entering The Tower. Later in the game, the collum o' golem look-a-likes can be encountered as common enemies.
Golem (ゴーレム, Gōremu ) Big Book of Beasts No. : #283 (3DS only)  | |||||||||||||||||||||||||||||||||||||||||||||||||||||||
| |||||||||||||||||||||||||||||||||||||||||||||||||||||||
| |||||||||||||||||||||||||||||||||||||||||||||||||||||||
Dragon Quest VIII: Journey of the Cursed King
Golem (ゴーレム, Gōremu ) Defeated Monster List No. : #156  | ||||||||||||||||||||||||||||||||||||||||||||||||||||||||
| ||||||||||||||||||||||||||||||||||||||||||||||||||||||||
| ||||||||||||||||||||||||||||||||||||||||||||||||||||||||

While normal golems do not appear until later on in the story, the player can find a wandering one in the Maella Region that they can recruit for their monster team.
Dragon Quest IX: Sentinels of the Starry Skies
| ##161 - Golem | |||||||||||||||||||||||||||||||||||||||||||
|---|---|---|---|---|---|---|---|---|---|---|---|---|---|---|---|---|---|---|---|---|---|---|---|---|---|---|---|---|---|---|---|---|---|---|---|---|---|---|---|---|---|---|---|

| |||||||||||||||||||||||||||||||||||||||||||
| |||||||||||||||||||||||||||||||||||||||||||
| Dropped Item | Flintstone (common, 1/16) Mythril ore (rare, 1/128) | ||||||||||||||||||||||||||||||||||||||||||
| Locations | Lonely Coast Wyrmwing Wyrmneck Wyrmsmaw Grotto | ||||||||||||||||||||||||||||||||||||||||||
| Skills | Psych Up Critical strike | ||||||||||||||||||||||||||||||||||||||||||
| Bestiary # | #161 | ||||||||||||||||||||||||||||||||||||||||||
| Game | Dragon Quest IX | ||||||||||||||||||||||||||||||||||||||||||
| Console | DS | ||||||||||||||||||||||||||||||||||||||||||
| Japanese Name | ゴーレム | ||||||||||||||||||||||||||||||||||||||||||
| Romanized Jap. | Gōremu | ||||||||||||||||||||||||||||||||||||||||||
| Description | Though weak against wind, these stony souls will weather a storm of blows before unleashing a cataclysmic critical attack. If you ask them which monster has the most mates, they won't hesitate to suggest their own big-headed, bricky selves. | ||||||||||||||||||||||||||||||||||||||||||
Dragon Quest X
 |
This article is a stub. You can help by expanding it. |
Dragon Quest XI: Echoes of an Elusive Age
Golem (ゴーレム, Gōremu ) Defeated Monster List No. : #145  | ||||||||||||||||||||||||||||||||||||||||||||||||||||||||||||||||
| ||||||||||||||||||||||||||||||||||||||||||||||||||||||||||||||||
| ||||||||||||||||||||||||||||||||||||||||||||||||||||||||||||||||

This monster does not have a vicious, not a malicious variant.
Dragon Quest Monsters
Golem (ゴーレム, Gōremu )  | |||||||||||||||||||||||||||||||||||||||||||||||||||||||||||||||||||||||||||||||||||||||||||||||||||||||||


A golem is the boss of Gate of Talisman. They can be made by breeding two muddolls.
Dragon Quest Monsters 2
Golem (ゴーレム, Gōremu )  | |||||||||||||||||||||||||||||||||||||||||||||||||||||||||||||||||||||||||||||||||||||||||||||||||||||||||||
Dragon Quest Monsters: Caravan Heart
The golem is a three-star members of the Material family with a weight of 3. It naturally learns Save Power, United Soul and Body Slam. Its in-game description reads "A giant formed out of the soil in order to protect people."
Dragon Quest Monsters: Joker
Golems are rank A members of the Material family, but not the top A monster of that group. A golem acts as the sentinel of the Xeroph Isle shrine and must be defeated in order to help the Incarnus reach its goal.
Golem (ゴーレム, Gōremu ) Bestiary number: #139  | |||||||||||||||||||||||||||||||||||||||||||||
| |||||||||||||||||||||||||||||||||||||||||||||

Dragon Quest Monsters: Joker 2
Golem (ゴーレム, Gōremu ) Bestiary number: #149  | |||||||||||||||||||||||||||||||||||||||||||||||||
| |||||||||||||||||||||||||||||||||||||||||||||||||

Dragon Quest Monsters: Terry's Wonderland 3D
|
|
This article is a stub. You can help by expanding it. |
Dragon Quest Monsters 2: Iru and Luca's Marvelous Mysterious Key
|
|
This article is a stub. You can help by expanding it. |
Dragon Quest Monsters: Joker 3
|
|
This article is a stub. You can help by expanding it. |
Dragon Quest Monsters: The Dark Prince
Golem (ゴーレム, ) Monsterpedia No.: #340  | ||||||||||||||||||||||||||||||||||||||||||||||||
| ||||||||||||||||||||||||||||||||||||||||||||||||
| ||||||||||||||||||||||||||||||||||||||||||||||||


| ||||||


Dragon Quest Heroes: Rocket Slime
Golems do not appear until near the end of the game, acting as mechs piloted by platypunk members of the Plob within the Flying Clawtress and can also be piloted by the player once unmanned. They are potent monsters, capable of delivering charging punches and hitting their fists together to ward off opponents that are too close for comfort. If one is already being manned by a platypunk, it must be struck with three Elasto Blasts before the pilot will be forced to disembark. These 'liberated' golems, and ones left unattended, can only suffer another three attacks before they go inoperable and explode, regardless of whether the player is piloting them or they are unmanned. Since they are too big and heavy to be knocked into the air and carried around, a chimaera wing must be thrown at them in order to send them back to town.
Golems can also be used in tank battles, though they act the same way as they do outside of these battles, meaning they do nothing more than stand idle until the player jumps in to command one, being somewhat disadvantageous since only two other crew members will be left free and even more disadvantageous if these remaining crew members are poor at handling the cannons. This aside, golems can be incredibly useful when it comes to sabotaging an enemy tank since their fist-clapping move can quickly break open the entryway of an enemy tank, and their charging punches can wreck a whole wall of machinery when positioned right and easily enable one to reach the enemy's engine when the time arrives, but they can still only deal with three attacks before being defeated. An exploding golem can damage the player both inside and outside of tank battles, so it is recommended to gain some distance when a golem has taken as much as it can.
Dragon Quest Swords: The Masked Queen and the Tower of Mirrors
A golem named Briquet is the boss of Galantyne Glades.

Dragon Quest Heroes: The World Tree's Woe and the Blight Below
Golem (ゴーレム Gōremu)

| Model | Experience | Gold |
 |
35 | 16g |
| List No. | #010 |
| Field Notes | Automatons formed of earth by monstrous mitts, they forgo spells and weapons for old-fashioned fisticuffs. They barely seem to flinch at regular attacks...and then drop to the dirt in a defeated pile of dust. |
| Location(s) | Arba Castle (Captain), Big-Eye Boulevard (Things for a Fabulous Ring), Colissea (Recruit, Hero), Colissean Desert (Recruit, Hero), Grannet (Recruit), Guardian's Grove (In Search of Elevation), Sylvea (Recruit, Captain) |
| Item(s) Dropped | Flintstone, Royal soil |
Dragon Quest Heroes II
Golem (ゴーレム Gōremu)

| Model | Experience | Gold | Marked Version? |
|
64 | 16g | Yes |
| List No. | #017 |
| Field Notes | Automatons formed of earth by monstrous mitts, they forgo spells and weapons for old-fashioned fisticuffs. They barely seem to flinch at regular attacks...and then drop to the dirt in a defeated pile of dust. |
| Location(s) | The Battle of Dunisia, The Grand Dunes |
| Item(s) Dropped | Mirrorstone, Loin-girder |
Dragon Quest Builders
Like in the original Dragon Quest, the golem is the first boss fought in the game. At the end of Chapter 1, the golem attacks Cantlin and must be defeated. Regular enemy golems after this point drop chunks of golemite.
Strategy
The player must use Cantlin Shields to deflect the golem's attacks as it hurls boulders at the city. After about three times, the golem will be enraged and begin spinning around in circles. When it stops, it is dizzy. This is the time to use a wrecking ball on it. The wrecking ball will blast it into pieces and take a chunk of its HP off. Then, the pieces reassemble and the golem begins hurling boulders anew, repeating the cycle.
Dragon Quest Builders 2
|
|
This article is a stub. You can help by expanding it. |
Dragon Quest Treasures
Golem Bestiary number: #38 
| ||||||||||||||||||||||||||||||||||||||||||||||||||||||||||||||||||||||||||||||||||||||||||||


Dragon Quest Walk
|
|
This article is a stub. You can help by expanding it. |
Dragon Quest Tact
Golem appears as a D-rank monster of the Inorganic family. It can be faced as a boss in Chapter 3, Episode 7: A Fearsome Foe of the main storyline and it will join the party after being defeated. It can be fully awakened by completing Chapters 10-2, 11-6, and 11-8. The golem stars in its own Battle Road and it can participate in the Battle Roads of Majellan, wax murderer, Slon the Rook, and Red Robbin' Hood as a party member.
  Golem (ゴーレム Gōremu) Golem (ゴーレム Gōremu) | ||||||||||||||||||||||||||||||||||||||||||||||||||||||||||||||||||||||||||||||||||||||||


Dragon Quest Keshi Keshi
|
|
This article is a stub. You can help by expanding it. |
Etymology
Golems are beings from jewish folklore, often portrayed as servants animated from clay that obediently carry out orders but often to warped or far too literal extents.
Gallery
-
 Famicom art.
 -
 The Hero battling the Golem.
 -
 Super Famicom art.
 -
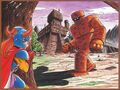 1989 calendar artwork of the Golem.
 -

-

-
 VII Reimagined polygon model.
 -
 A Golem in X.
 -
 XI polygon model.
 -
 An early screenshot of a battle with a Golem in XI.
 -
 DQM1·2 sprite.
 -
 Caravan Heart sprite.
 -
 Joker model.
 -
 Joker 2 model.
 -
 Monsters: 3D model.
 -
 Battle Road Victory cut-in
 -

-

-

-
 Golemator tank in Rocket Slime.
 -

-
 Heroes, promotional render.
 -
 Alena performing Multifists on a Golem.
 -

-

-

-
 Golem battle in Builders.
 -
 Levelling up.
 -
 Stars model.
 -
 Rivals card.
 -
 Tact model.
 -
 A Golem in Keshi Keshi.
 -
 A Golem from the Sofubi Monster merchandise series.
 -
 3D Monster Picture Book Figure.
 -
 DQ Trading Card Game card.
 -
 The DIVE artwork.


Categories:
- Pages using Tabber parser tag
- Stubs
- Material family
- Dragon Quest I enemies
- Dragon Quest I bosses
- Dragon Quest I & II HD-2D Remake enemies
- Dragon Quest I & II HD-2D Remake bosses
- Dragon Quest V enemies
- Dragon Quest VII enemies
- Dragon Quest VII bosses
- Dragon Quest VIII enemies
- Dragon Quest IX enemies
- Dragon Quest X enemies
- Dragon Quest XI enemies
- Torneko: The Last Hope enemies
- Young Yangus and the Mysterious Dungeon enemies
- Dragon Quest Monsters enemies
- Dragon Quest Monsters 2 enemies
- Dragon Quest Monsters: Caravan Heart enemies
- Dragon Quest Monsters: Joker enemies
- Dragon Quest Monsters: Joker bosses
- Dragon Quest Monsters: Joker 2 enemies
- Dragon Quest Monsters: Terry's Wonderland 3D enemies
- Dragon Quest Monsters 2: Iru and Luca's Marvelous Mysterious Key enemies
- Dragon Quest Monsters: Joker 3 enemies
- Dragon Quest Monsters: The Dark Prince enemies
- Dragon Quest Monsters: The Withered World enemies
- Dragon Quest Swords bosses
- Dragon Quest Swords enemies
- Dragon Quest Monster Battle Road Victory enemies
- Dragon Quest Heroes enemies
- Dragon Quest Builders enemies
- Dragon Quest Builders bosses
- Dragon Quest Builders 2 enemies
- Dragon Quest Treasures enemies
- Dragon Quest Walk enemies
- Dragon Quest Walk bosses
- Dragon Quest Tact bosses
- Dragon Quest Tact monsters
- Dragon Quest Keshi Keshi enemies
- Dragon Quest Smash/Grow enemies